
This week some friends gave me a wonderful gift … a delightful book by forager and chef Robin Kort, The Coastal Foragers Cookbook: Feasting Wild in the Pacific Northwest.
Naturally she talks a lot about wonderful mushrooms I am well-acquainted with, but much more as well: edible plants, berries, seaweed and shellfish. She also provides a timetable of what is harvestable when, and this immediately spurred me to get out there and begin looking for things that I can be working on now, in the early Spring.
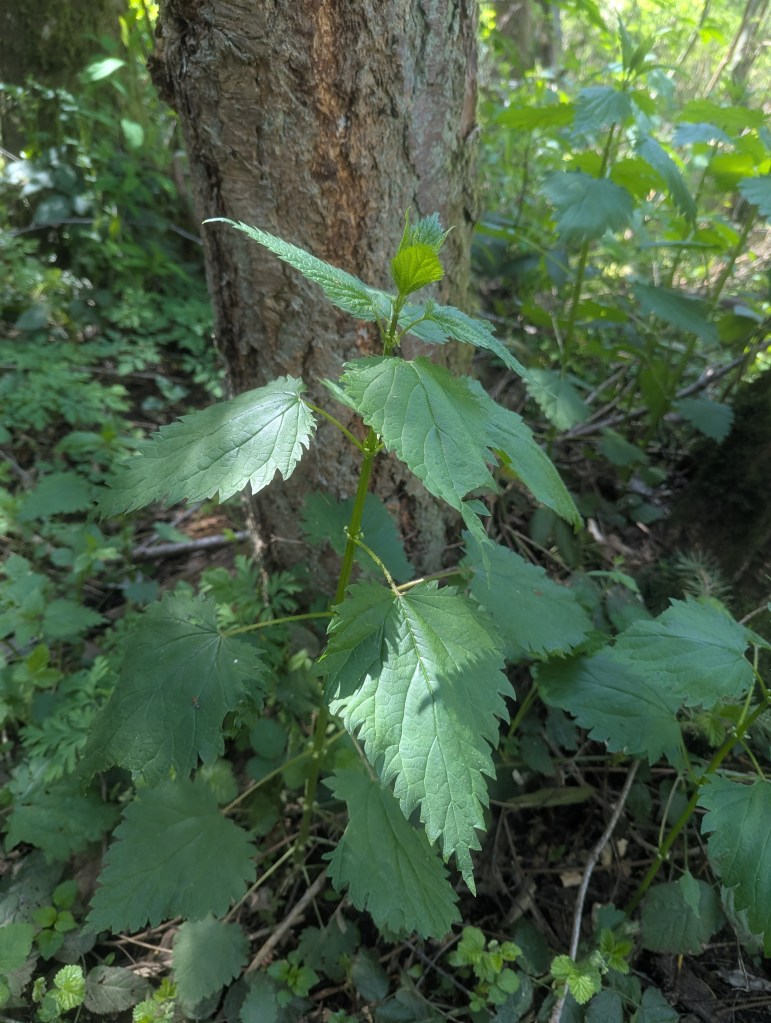
Something New: Stinging Nettles
So, two things (something new and something improved) consumed my time this week. The “something new” is stinging nettles. I paid a visit and was able to (safely and without injury, thanks to a thick pair of rubber gloves and other implements) collect several gallons of fresh, young stinging nettle leaves and stalks.
Robin has some wonderful recipes, mostly using nettles as a healthy and tasty replacement for spinach. But when I reached out to her and we were chatting on another topic (roasting, grinding and brewing dandelion roots as a caffeine-free replacement for traditional coffee) she told me that she personally liked nettle tea better than dandelion root coffee (which she finds a little too bitter). I do like a dark coffee but I was intrigued by the idea of what nettle tea might taste like, so I brewed some up (which is quite a bit easier than preparing dandelion root coffee). Here’s how you can do it:
Carefully collect nettle leaves and stalks, taking great care not to get stung. (Nettle needles are found on the bottom of leaves and also cover the stalks. They inject formic acid, and if you’ve been stung you know the sensation is quite unpleasant. Although you can diminish the pain somewhat if you find a large slug anywhere nearby … their slime, while also unpleasant, contains a natural anesthetic that helps relieve the sting.)

Slugs aside, you can brew these nettle leaves and stalks fresh (10 minutes in boiling water), adding a few sprigs of fresh mint for flavor and then sweetening to your liking with honey or agave. I strained out the solids (what I don’t eat, like stalks, goes in the mulcher) before adding sweetener.
Once nettles are immersed in boiling water, their potential to sting you is significantly diminished.
Nettles and Feta, Yum!
Since I also wanted to experiment with nettle leaves as a replacement for spinach, after a few minutes I removed the leaves from the water (leaving the stalks to boil longer) and sauteed them in a frying pan with butter, lemon juice, a pinch of salt and pepper. After a few minutes more I stirred in some crumbled feta cheese, which is my preferred recipe for steamed spinach. I removed from heat and ate the nettles with feta, butter and lemon as a side dish. It was wonderful, at least as good as spinach, in my opinion.
I have yet to attempt one of Robin’s other recipes for nettles, but I will do so. And I did enjoy the tea. It has a unique, earthy flavor, quite understated. Mostly what you will taste is whatever you sweeten it with. I think the mint helps a little since the nettle flavor itself is so subtle.
One last nettle note. My sister Kay, who is an avid forager and knows way more about wild plants than I do, taught me how to (carefully) collect young nettle leaves, and eat them … raw! Sounds impossible, right? I actually found it quite intriguing. You carefully grasp a young nettle leave from the top only, folding the underside in upon itself like a taco. (I say carefully — but you would also be advised to wear gloves for this in case something “slips!”)
Once you have your stinging nettle “taco,” simply pop it into your mouth, chew and enjoy. It won’t sting you on your mouth, as the cells inside your mouth are different than those on your skin. Instead it creates an odd tingling sensation as you chew it, and the taste is not unpleasant.
Dandelion Mead
I’ve made this once before … to rave reviews (even a professional meadery I visited during a Harvest Hosts trip through Iowa told me it was one of the best meads they had ever tasted) … and I was very sorry when it was all consumed or given away.
So I decided to make some more. Here’s my recipe. This time I went for 5 gallons (a little more than the first time I made it, so hopefully this will last longer).
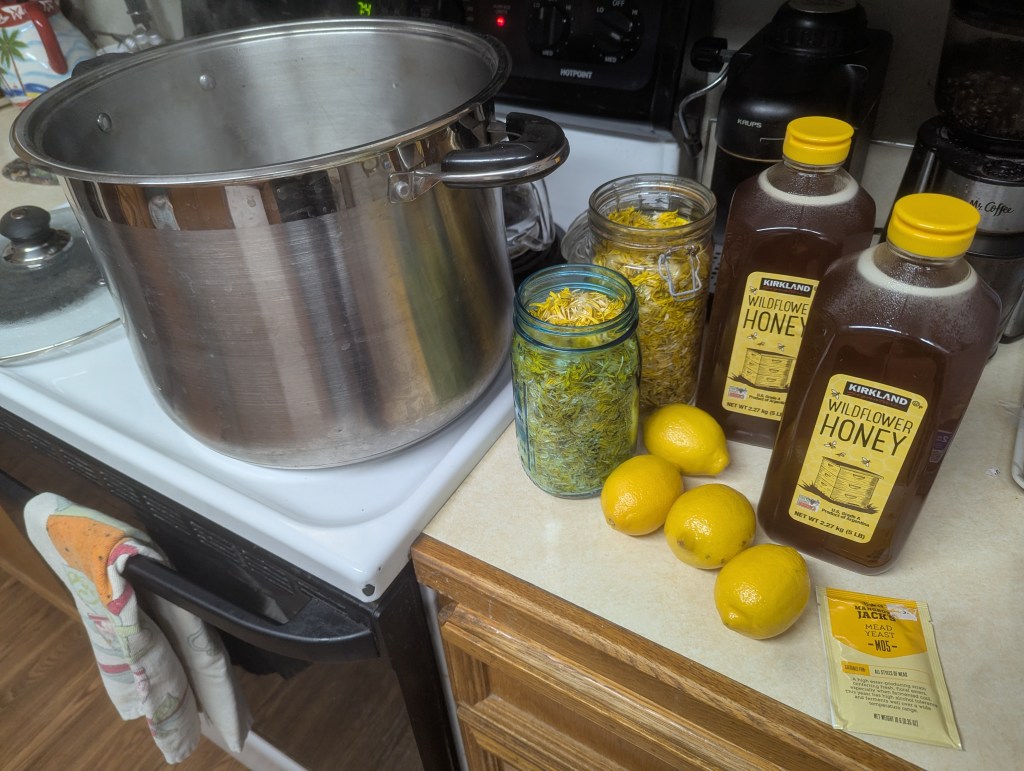
The ingredients:
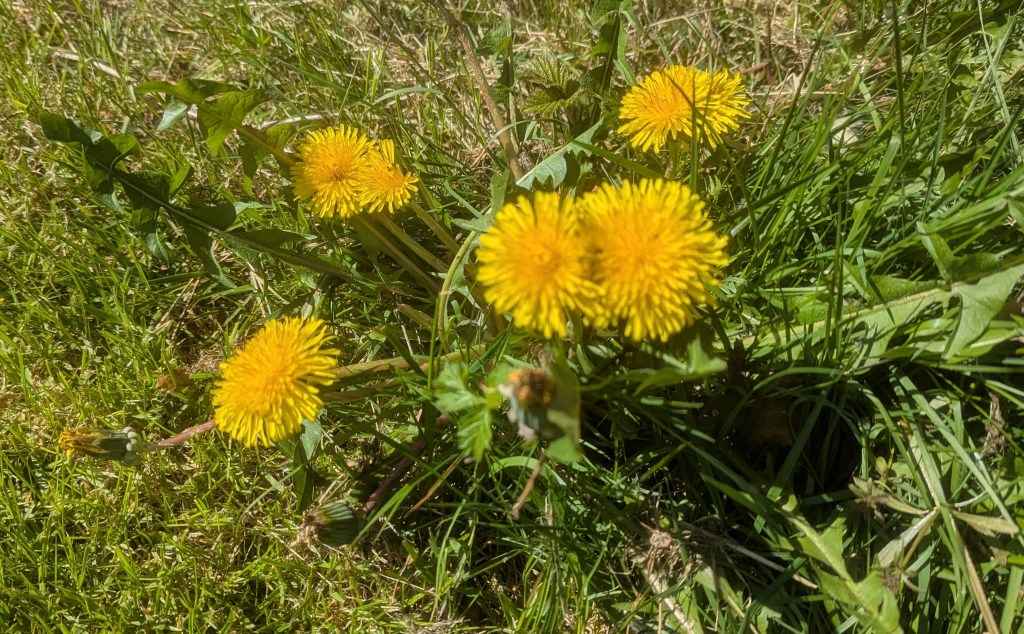
- Approximately a half-gallon of fresh dandelion blossoms. This is the most labor-intensive part of the process. Right now (early April) is the best time to collect them here in the Northwest. Look for a grassy field which has not been touched by either chemicals or too much animal refuse. Full blossoms work best, and should be prepared as soon as you get home. Every bit of greenery needs to be removed. I find that grasping the blossoms (bunched together) in two or three fingers of one hand, and the stem portion of the flower in the other, then pulling apart in a twisting motion, works best. Toss anything green and set the blossoms aside. To collect and prepare a half-gallon will probably take three or four hours total.
- About 14 pounds of high-quality wildflower honey. This is the most expensive part of the process; I invested about $50, or about $10 per gallon of mead.
- About 3 gallons or so of good quality fresh drinking water, filtered or spring water, free of chlorine or anything that might create an “off” flavor.
- 4 large or 5 medium fresh lemons. The juice will be added. I also cut up the skins but later thought better of it and removed most of them. Though you might try adding some zest from the rind to your “must” (the combination of liquid and solid ingredients).
- One packet of a good quality sweet mead yeast (unless you prefer your mead dryer, or less sweet, in which case you can add a more vigorous yeast).
- Optional: About two teaspoons of yeast nutrient (it will help your yeast do its job … the way yeast works is that it grows and multiplies in the presence of sugar, consuming the sweet and excreting alcohol and carbon dioxide as “waste.” When this waste reaches a certain point, the yeast stabilizes, dead yeast floats to the bottom of your must, and you can enjoy the clarified and bottled results).
The process:
In a large stockpot, bring your three gallons of water and your dandelion petals to a boil, then remove from heat and steep your brew. After about 15 minutes of this, add your honey, and then your lemon juice and zest. Stir and monitor the temperature of your brew. In order to keep it sterile I was hoping (by keeping it covered) to keep it above 160 degrees Fahrenheit. It dropped below a bit early in the process, so I turned the burner back on (low), stirring frequently, until it warmed up to about 165 degrees F.
Next you are ready to put your brew into fermentation. Use a 5 or 6 gallon glass carboy. These are equipped with rubber stopper “airlock” devices on the top opening. One of the goals of this process is to minimize the must’s exposure to oxygen. Using a large sterile funnel (all equipment you use should first be sterilized), fill to within 2″ of the top then cap.
Since I only had a 5-gallon carboy, and about 6 gallons of must, I added a one-gallon carboy.
Monitor the temperature. Once it drops below 90 degrees F add your yeast to the must and agitate so that it disperses throughout the must. You can also add your yeast nutrient at this point.
Be sure to get a specific gravity reading using a hydrometer. By taking separate readings before and after fermentation, you will be able to calculate what your final ABV (alcohol content) will be.
I store my carboys in a room which maintains a constant temperature in the 60Fs. 60F is ideal for taking hydrometer readings, and the yeast can work at anywhere from 50F to about 85F.
Within about 24 hours the yeast should start doing its magic and you will see bubbles and carbon dioxide escaping out of your airlock. This process should continue for about a month or so. Once it stops bubbling, your mead should be ready for bottling.
One more thing: Somewhere halfway through the process you will want (once again using sterile implements) to “decant” your mead from one carboy into a clean carboy, straining out the solids in the must during the process. By this time your dandelion blossoms will have done their work to add that nice floral flavor, and they can come out. The remaining few weeks in carboy, your yeast should settle to the bottom and the mead should clarify to a nice golden color. All that remains is to decant the clear liquid into bottles.
(Be sure to mulch the solid waste from your must in a mulcher … like mushroom mulch, this will ultimately be good fodder in your garden.)
If your mead remains cloudy after it’s time to bottle, you can always add a clarifying agent (like seaweed) and/or filter the final product as you bottle.
Use a gravity/suction based setup to decant your liquid from a clear point an inch or so above the must on the bottom of the carboy, directly into bottles. After filling your bottle up to the point where the neck begins, I use a corker to cork the bottles. (I also boil the corks briefly to aid the process and make sure they’re sterile.) If you want to assist in maintaining quality of the mead while it ages in the bottle, drop some melted corking wax onto the top of the cork. (For a classy touch, I also “stamp” a design into this warm red wax with a metal seal.)
Clear glass bottles will show off the color and clarity of your mead. I advise letting it age in bottle (in a cool, dark place if you don’t have a wine cellar) for a few months, at least, before consuming … but it should be drinkable at any point.
If you bottle in May or June, your customized dandelion mead will make a lovely Christmas gift! Five gallons of mead should yield at least 16 or more bottles of wine, so your final cost (not including labor, of course) should be less than $4 per bottle. (Though I dare say if you were to sell such a fine quality mead, it would fetch at least three or four times that price!)
So What’s Next?
Spring is also a great time to forage for fiddleheads. What’s a fiddlehead? It’s the curly top of certain new spring ferns.
I asked Robin what her favorite fern was for foraging fiddleheads. (I have Bracken Ferns, Sword Ferns, and a few Deer Ferns on my property here in the Puget Sound region.) She said Bracken Ferns produce much tastier fiddleheads than the other two, so that’s my next quest, to fry up a pan of Bracken Fern fiddleheads. (I don’t think she has a fiddleheads recipe in her book, so I’ll experiment.)
Then later this summer, I want to try her recipe for Pine Cone Molasses. Basically you collect green pine cones from trees like Cedar or Douglas Fir (I have both on my property), pack them in sterile jars at a ratio of 1:1 with brown sugar, and let them ferment for a month, until the sugar turns dark and sticky like molasses. Imagine pine-flavored molasses as a topping for desserts or mixed into drinks! Sounds delicious.
So, stay tuned to this channel and I’ll report back soon. (And of course, there will be more about Spring Mushrooms! I am planning morel hunting as well as foraging berries and possibly more fiddleheads in Idaho next month. Then on to the Northeast for more mushrooms and ramps … a sort of wild leek.)

Leave a comment