During the long, cool, dark and damp winter months here in the Pacific Northwest, there isn’t a whole lot a mushroom enthusiast can do in terms of going out and finding those exciting wild mushrooms in the wild.
So this winter I decided to try my hand at growing some here on my own property at home.
I read up on how to implant the spores of specific exotic edible and medicinal mushrooms into hardwood logs. It’s relatively simple …
First you create a suitable space for your log farm. Mine was a 20-foot by 8-foot spot on my property where nothing else would interfere. I leveled my rectangle, laid down visqueen to prevent weeds, put an outdoorwood frame down on top of it, and topped the rectangle with one-half scoop of pea gravel. (I read that you should set up your logs on gravel and not soil in order to prevent contamination from organisms in the soil.)
The rectangle was slightly angled for good water drainage. I built an outdoorwood stabilizing structure (about 2′ above the ground, mounted every 8′ on pier blogs and 4x4s) of four 8′ lengths of 2×4 outdoor wood for setting up two 16′ rows that would each accompany at least 20 three- to four-foot long hardwood logs apiece, laid teepee-style in twos.
Most of the hardwood I had available on my lot was Alder (33 logs), and also a dozen bigleaf Maple logs. Finally I added a single Douglas Fir log (I have a lot of this on the property too) to test whether Turkey Tail would take root in it. I’m pretty sure I’ve seen Turkey Tail in Douglas Fir out in nature. We’ll see. But generally, hardwood is the ticket.
What I wish I had was some oak. We don’t have much here in the Northwest, and there’s none growing on my property. Perhaps eventually I’ll be able to lay my hands on some.
What I Planted, and How
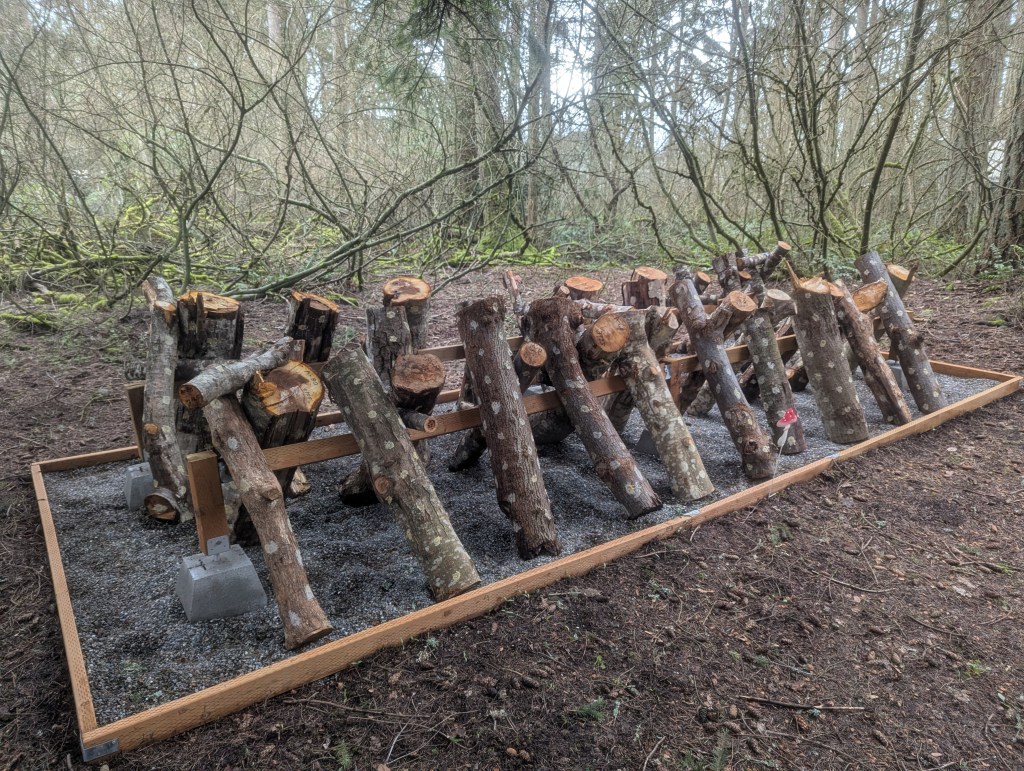
I then purchased about 20 containers of 100 birchwood dowels, about 5/16″ diameter and 1 inch in length, from several suppliers, at an average cost of $17 per container. The containers represented 12 varieties of exotic edibles (with some duplication of mushrooms I wanted more of) and two medicinal mushrooms. After wire-brushing my logs to remove any visible potential competitors (such as moss and lichens), I drilled approximately 50 5/16″ holes in each log, in a diamond pattern with each an average of 4 to 6 inches distant from the others. The holes were drilled at least an inch deep before the mycelium-impregnated dowels were inserted then hammered down if necessary; then I sealed each dowel over with melted organic beeswax. (Hence the light-colored spots on the logs which you see in the photo.) To melt and apply the beeswax I used a hot water bath in an old crockpot of my wife’s. The electric crockpot kept the wax liquid while I was applying it over each dowel with a 1″ paintbrush.
I used a special drill bit constructed just for the purpose of drilling these 2,000 holes, but discovered it wouldn’t go quite deep enough for my liking. So I typically made a second pass with a 5/16″ drill bit, burrowing out about a quarter inch more of depth so I could sink each dowel just even with the surface without having to smash it down with the hammer.
The dowels often came with some nutrient (barley, I think) covered in mycelium, so I also inserted what I could of that into the holes before capping them with the dowels.
By way of experimentation, I attempted to use two types of wood (Maple and Alder) for each mushroom, except for some of the Oysters, as I had more Alder at hand than Maple.
Here are the types of mushrooms I implanted:
- 7 different types of Oyster mushrooms (Oysters are delicious and there are a wide variety of types. I’ve enjoyed them for years). They flush relatively quickly — usually within 6 months — and will typically keep flushing for about two years before they exhaust the nutrients in the logs (dependent, I hear tell, on log size and hardness). In all I set up:
- Golden Oysters — in 5 Alder logs
- Pink Oysters — in 1 Alder log and 1 Maple log
- Blue Oysters — in 2 Alder logs
- White Elm Oysters — in 2 Alder logs
- Pearl Oysters — in 2 Alder logs
- King Oysters (white) — in 2-1/2 Alder logs*
- King Oysters (black) — in 1-1/2 Alder logs*
*I combined white and black King Oysters on opposite sides of one large Alder log. This was fairly experimental as you generally aren’t supposed to mix two species of mushroom in a single log.
- My next largest investment was Lion’s Mane. I set up Lion’s Mane (one of my favorite wood-borne mushrooms) in 9 logs (7 Alder and 2 Maple). It will probably take Lion’s Mane about 2 years to flush, but it could perpetuate for as many as 6 years.
- Next was Shiitake, in 4 logs (2 Alder and 2 Maples). Shiitake is not my favorite mushroom, but it is supposed to grow very well and profusely in hardwood logs. I could have Shiitake in about 1-2 years.
- I enjoy Chicken of the Woods, although I find it more in the Northeast than the Northwest. This is the mushroom that loves oak the best, but I didn’t have any, so I set it up in 2 Maple logs and 1 Alder log. We’ll see what happens.
- Maitake (“Hen of the Woods”) is a wonderful mushroom. I set it up in 3 logs (2 Alder, 1 Maple).
- Chestnut Mushrooms are new to me, but are supposed to be very tasty. I set these up in 2 logs (1 Alder, 1 Maple).
- Last but not least are the medicinal mushrooms. (Rather than eating them, you dehydrate and grind them to powder to add into foods or make tea out of.) I set up Reishi in 2 Alder logs. (Reishi has very nice antioxidant properties.)
- Finally came Turkey Tail (which is an immune booster known to have certain properties that fight breast cancer). I set this up in 1 Douglas Fir log, and 1 Maple log.
Now all I have to do is wait. Although eventually (when the weather dries out a bit this summer) I want to add a misting system above the log farm to keep everything nice and damp between rainfalls.
What It Cost
I estimate that I spent about $200 for lumber, hardware, and gravel. The Visqueen and some of the hardware I already had on hand, so it might have been a bit more otherwise.
Then I spent about $340 on my biggest single expense, my spawn dowel plugs — 2,000 of them total! So, about 17 cents per plug. I spent maybe another $30 on related supplies (bees wax and the special drill bit). Rather than metal-tagging each log, which would have added quite a bit of cost, I simply marked it on one end with a permanent black marker, and created a master key map of the entire project showing what was implanted where, for use when the markings have faded.
I didn’t track my labor on all this precisely, but I’m guessing it probably came in at about 60 hours, including the time spent cutting the wood (on my own property or my neighbors’, with their blessing and a promise of mushrooms). Oh, and I also spent about $150 on maintenance on my chainsaw (a nice 20″ Husqvarna 455 Rancher), but that wasn’t entirely the fault of this particular project. I’d also been cutting a lot of firewood.
So anyway, aside from my labor and attributing about half of the chain saw repair to this project, I spent a total of just under $650 on the project. I won’t include any cost for my labor as this was fun and I am retired, after all!
What Yield Can I Expect?
I researched that question, and naturally the yield of each mushroom log depends on a number of factors — the mushroom species itself, the medium (log type, diameter, age, and length), growing environment, how many repeating flushes, etc. (Some say you can extend the flushing life by “stressing” the mushrooms between flushes. Ways to do this include immersing the log in a water bath for 24 hours, and whacking the log on the ends with a sledge hammer. The water bath won’t be practical in my setup, unless I construct a bigger bath, but I’ll experiment with the “whacking” technique later to see whether it works or not.)
For Shiitake, which as I understand it is probably one of the higher-yielding mushrooms in terms of weight (Oysters might be up there or possibly higher — not sure about the other varieties), the anticipated yield if the farm is “professionally maintained” should be about 3 pounds of mushrooms per log per year.
Playing with this number, my rough calculations showed that I could potentially expect something like 500 pounds of mushrooms out of this log farm over its life. Maybe 100 pounds per year.
If I actually get that many mushrooms out of this log farm, I’ll be a happy camper! (Try multiplying 500 pounds by an average market value for each mushroom type of well above $20/pound, and you’ll see that could possibly be a pretty good return on investment.) And if that happens, each winter I’ll probably continue weeding out old, depleted logs and replacing them with new, fresh ones.
I’m not in this for the money, so I won’t sell any. But I do plan to eat a lot and keep my mushroom-loving friends and co-foragers supplied!
I’ve had a little go at a similar log technique in the past which showed some success. I implanted Pearl Oyster spawn in three or four individual 3′ by 6″ maple logs, mounted up using outdoorwood triangular structures that kept them off the ground (see photo below). They did bear quite nicely for about two years. I tried water baths to extend their flushing cycles, which typically ran every few months in the spring, summer and fall; but after two years nothing much seemed to happen in terms of revitalizing the logs. It’s possible the oysters ate up all the nematodes in the logs and ran out of nitrogen fuel. (Read this article in Scientific American if you’d like to learn more about this interesting phenomenon. Yes, Oyster Mushrooms are carnivores! Their mycelium is designed to lure microscopic worms, or nematodes (also known as roundworms), then paralyze and entrap them, harvesting their corpses for nitrogen, which the mushroom needs to survive but the hardwood it grows in does not supply! It’s amazing.)
So anyway — carnivorous mushrooms aside — please stay posted for more results from my little experiment. I’ll be excited for my first flush, probably of something Oyster-ish, possibly by this Fall. We will break out the champagne and I’ll share pictures when that happens! (Just don’t tell the nematodes!)
By the way, you can get faster flushes with most of these mushrooms if you inject liquid mycelium or the dowels themselves into sterile sawdust medium bags, and ripen these in humidity tents indoors. They will repeat once or twice, but the flushing cycles are not supposed to last as long as what you get with hardwood logs. Also, if you try this (indoors) with oyster mushrooms, make sure no one in your household suffers from “mushroom workers’ lung,” which is a common allergy to the airborne spores of Oyster mushrooms. I discovered this the hard way when I was growing Oyster mushrooms in spawn bags at home, and my wife kept getting sick! That’s when I got kicked outside. Well, not me, just my mushrooms …

Pearl Oysters flushing from a straw log indoors. Listen carefully and you can hear my wife coughing in the background.

I built this mushroom bath for my oyster logs when they stopped flushing after about two years outside. But the moss on the Maple probably should have been a clue they were done.

In addition to the varieties I mentioned, you can also grow crimini/portobello mushrooms at home in bag medium. I like portobellos, but I think the more exotics are more fun.

Leave a comment